
DairyLive Companion is a program for the Palm operating system that let's you take your DairyLive data with you wherever you go. Using DairyLive Companion, you can download your check lists and animal details from your PC to your Palm-based computer. From your Palm computer, you can enter new events and then upload these events back to your PC.
Important note: Windows 7 does not support the Palm desktop synchronization software, therefore, you cannot use the DairyLive Companion with that version of Windows. The Palm desktop software is still supported for Vista 32-bits and earlier.
Additional note: Living Software does not provide support for Palm-to-PC synchronization issues. If you cannot synchronize your other Palm applications with your desktop, you will not be able to synchronize with DairyLive Companion.
This help topic describes how to setup and use DairyLive with DairyLive Companion. The basic installation steps are:
These three steps only need to be done once. After you have installed DairyLive Companion, you simply perform a HotSync operation to synchronize the data on your PC with the data on your Palm computer.
Before you can use DairyLive Companion, you will need to make sure you have installed the Palm Desktop software on your PC. See your Palm computer documentation for information on how to do this. Make sure that your PC and your Palm computer can communicate before proceeding with the installation of DairyLive Companion.
After you have installed DairyLive, you will need to configure DairyLive so that the DairyLive Companion program is downloaded to the Palm computer during the next HotSync operation.
Start up DairyLive and open the herd database that you want to use for synchronizing with the Palm. From the Tools menu, select Setup DairyLive Companion. The DairyLive Companion Setup dialog will be shown. This dialog has two tabs: General and Check Lists.
On the General tab, check the box "Use this herd for synchronizing with DairyLive Companion". Also provide an "abbreviated" herd name, which can be up to eight characters. Also check the box "Download DairyLive Companion to Palm computer during next HotSync". Note that whenever you install a new version of DairyLive Companion, you should repeat this process to make sure that the latest DairyLive Companion is downloaded to the Palm.
Next, go to the Check Lists tab. You will see a list of all check lists arranged in a tree fashion. Each check list name has a checkbox next to it. Check the lists that you want to be downloaded to DairyLive Companion during HotSync operations.
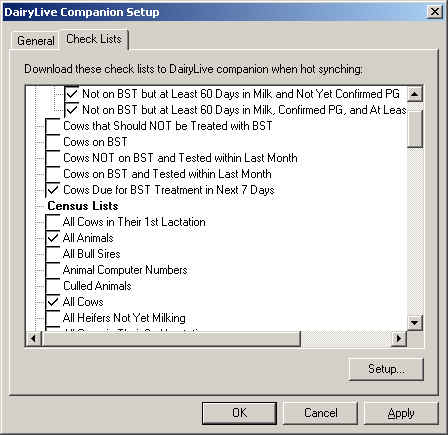
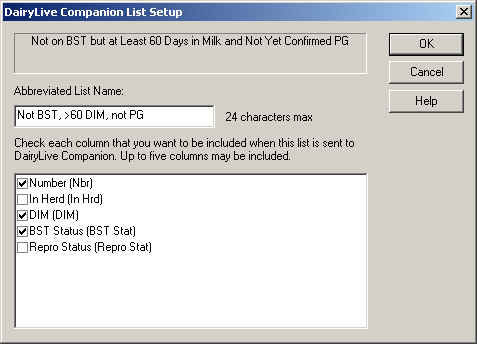
For each list that you want to download, select the list by clicking on the list name and then press the Setup button. This will show another dialog in which you can provide an "abbreviated" list name along with the columns you want to be included in the list. You can have up to five columns for each list. It suggested that you have just three columns, since five columns will sometimes cause some of the data to be clipped on the Palm. By default, the first three visible columns are automatically selected for you.
Hint: The more lists you select for the HotSync, the longer the HotSync operation will take. Download only the lists that you need access to when you are away from your PC.
After you have done this, exit DairyLive and perform a HotSync operation by pressing the HotSync button on your Palm computer. During this HotSync, the DairyLive Companion program will be downloaded to the Palm. After this first HotSync, you will need to do a second HotSynch in order to download the herd data.
When you perform a HotSync, data flows in two directions. First, any events that you entered into your Palm computer since the last HotSync will be uploaded to DairyLive on the PC. Second, the new check lists and animal details will be downloaded to the Palm computer. This process will take anywhere from a few seconds to a few minutes, depending on how many lists you download and how many animals there are.
To begin a HotSync operation, exit DairyLive and place your Palm computer in its cradle. Press the HotSync button and wait for the HotSync operation to finish. After it has finished, you can start up DairyLive on the PC and check for any warning or error messages by selecting Message Log from the View menu.
Now pick up your Palm computer and tap the DairyLive icon. You should see the program start up and it should show the contents of the first list (lists are order alphabetically).
You must exit DairyLive before performing a HotSync operation. If DairyLive is running when you start a HotSync, a message will appear asking you to shut down DairyLive. However, you may not notice the message, so it is best to make a habit of exiting DairyLive before each HotSync.
DairyLive Companion is designed to be very easy to use. If you are familiar with other Palm programs, you will find that DairyLive Companion works very much like those. This section describes how to actually use DairyLive Companion, once you have downloaded your data to it.
To start DairyLive Companion, tap on the DairyLive icon in your "Home" screen. You will see the first check list appear.
The upper right corner of the screen contains a "drop-down" list of all check lists that were downloaded. To select a different check list, just tap on the arrow and then on the name of the list you want to view.
Each list will have from one to five columns. The first line in the table contains the names of the animal properties that are being shown. To scroll through the list, tap on the scroll bars. These scroll bars work just like they do in Windows except that you use your stylus instead of a mouse.
To view more information about an animal in a list, just tap on the corresponding line in the list. This will show an Animal Details window. This window has two columns, one showing the name of each animal property, and the other showing the value of the property. (Any "undefined" or blank properties are not shown.) Use the scroll bar to scroll through the list of properties, and use the left and right arrows in the lower right corner to move between animals in the list.
Before adding an event, you should set the technician name. Do this by tapping on the herd name in the upper left corner of the screen and tapping Select Technician. Select the correct technician name. The choices are based on how you have set up your herd on the PC. It is not required to select a technician, but it is a good idea, so that the technician information can be attached to each event.
There are two ways to add an event. From the Animal Details window you can tap on the Add Event button. If you want to add the same event to more than one animal, then close the Animal Details window (if it is open), and check the animals you want to add the event for. Each line has a checkbox on the far left. Then tap on the Add Event button.
The Add Event window initially shows the event date and a place to select the event type. By default, the date is today, but you can change this by tapping on the date field. Select the type of event to add by tapping on the arrow next to "Event Type". Select the event type -- note that there may be an up and down arrow to allow you to scroll through the list of event types.
Once you have selected an event type, additional fields may appear where you can enter more information. Some fields may require you to use the Grafitti tool for entering text or numbers. Other fields are "drop-down" lists for selecting choices. Each event type also has a "Notes" field.
After you have entered all of the data for the event, tap either "Next" or "Add and Close". If you want to add more events to the same animal or animals, tap on Next. Otherwise, tap on "Add and Close".
Keep the following things in mind while using DairyLive Companion: