DairyLive now includes functions that can be used by professional heifer growers to manage their business. Previously these capabilities were provided in a separate program called HeiferLive. The two programs had much in common, so the heifer grower-specific functions have now been folded into DairyLive.
This topic describes how to use DairyLive to manage a heifer growing operation.
Using DairyLive, you can set up as many customers as you want. Customers are accessed from the Herd Explorer. To create a new customer, select the Customer group on the left side of the Explorer window and click on the Add button or select Object->New Customer. Then provide the requested information.
DairyLive can automatically compute, print, and even e-mail invoices to your customers on a periodic basis. To use this capability, you must tell DairyLive how you are going to bill your customers. You can set up more than one method and use different ones for different customers. For example, for one of your customers, you may charge by the day, and for another one you may charge by the weight gain.
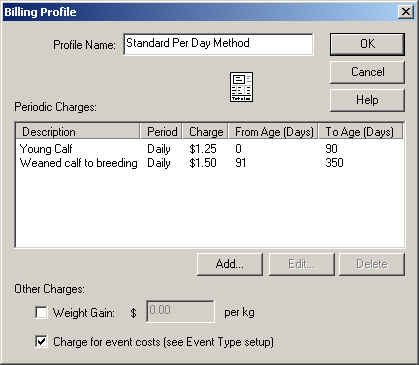
Billing profiles are used to describe how you bill your customers. Billing profiles are accessed from the Herd Explorer window. To create a new billing profile, select the Billing Profile group on the left side and click on the Plus sign in the toolbar or select Object->New Billing Profile. You will see a dialog like this one:
Periodic charges are applied for a period of time (daily, weekly, monthly, quarterly, yearly, or one-time). You can also charge by weight gain and the cost of events. To add a new periodic charge, click on the Add button and provide the requested information. Note that periodic charges are applied depending on the heifer's age. Be sure to include periodic charges that cover all age groups.
When you receive new heifers from a customer, the easiest way to enter this information into DairyLive is to use the Receive New Heifers dialog. To get to this dialog, select Manage Heifers from the Tools menu, and then select Receive New Heifers. This screen allows you to rapidly enter the basic data for each animal that is coming into the herd.

To enter a new heifer, you need to, at the minimum, provide the group name, breed, barn name/number, birthday, and date acquired. Optionally you can enter the initial measurements for each animal. For older heifers, you can enter breeding and pregnancy check information as well. After entering this information, click the Add button. Now DairyLive is ready to accept the next heifer.
No doubt you occassional take growth measurements (weight and possibly height) of the heifers in your herd. To enter this information into DairyLive, select the "Enter Growth/Body Condition Scores" from the Tools menu. You will see a dialog like this one:

Select a date for the measurement. Then, for each heifer, enter her barn name or number, and one or more of the following: Weight, Height, Body Condition Score. Then click Add or just press Enter on your keyboard. The measurement information will be entered and the fields along the bottom will be cleared, ready for the next entry. As each one is entered, you will hear a "ping" sound, and the information will be added to the list.
You can generate invoices as frequently as you want. Normally you should do this once a month. To create an invoice, select Manage Heifers from the Tools menu, and then Do Invoices. You will see a window showing all invoices that have ever been created. To generate an updated invoice, just select it.

To print or e-mail an invoice or invoices, select them and click on the Print or EMail button. To create a new invoice, click on the New button. In the dialog that appears, check the customers for whom you want to create an invoice and enter the invoice date. Then click OK. The new invoices will now appear in the Invoices window. To generate the data, select the desired invoices, and then print or e-mail them.
Hint: To select more than one invoice, click on the first invoice, and then hold the control key down on your keyboard while you select additional invoices.
At some point, it will be time to return some heifers to your customer. To do this, select the animals you want to return. You can select these animals from either the Herd Explorer or any check list window. Then select "Return Heifers to Customer" from the Animal menu. (In the Herd Explorer, the Animal menu is a submenu of the Object menu.)
In the dialog that appears, provide the date when the heifers were returned. You can also see a list of all the animals that you selected. There will be a check mark next to each one. You can remove the check mark from any animals you want to the exclude. Also, there's a place to type in some notes. Then click OK.
Once the heifers have been returned to the customer, HeiferLive will no longer generate any charges for them on your invoices.