This section will describe some of the usual day to day tasks that you will perform using DairyLive.
DairyLive is capable of importing 310 files from AgSource, "receive" files from AgriTech Analytics, and DNL files from Raleigh. (Other DHIA imports will be provided later.) You can also import 18*101# files from Boumatic parlor systems and test day files from Germainia. To import data one of these file types, select Tools->Import Data from the main menu and then select the desired file type for File Type. Enter the name of the file or use the Browse button to find it. Importing test day data is very similar to importing a herd history file or standard transfer file. See Import Data Dialog for more information.
DairyLive comes with several pre-defined check lists that are organized into several groups. You can use these lists "as is", modify them, or build your own.
As an example, under Census Lists, open the list called "All Sires". Now press the Design button and go to the Data page. You will see that the criteria for an animal to be listed are:
You may want to change the age criteria to 18 months. Click on the Value field for Age and change it to 18. Press the Close button. Now save the change by clicking on the Save button on the bottom of the List View window. Press Refresh to generate a new list.
Let's create a new check list by going back to the Herd Explorer and, with a list category selected on the left side, select Object->New Check List in the main menu. A new List View will be created called "New Check List". Press the Design button and go to the Data page. The Barn Name will already be listed as the first field and "Culled equals No" will be the second field. In the third row, select "Last SCC" in the first column, "more than" in the second column, and type "1000" in the third column. In the fourth row, select "Last Test Date" in the first column and leave the other columns as they are. Go back to the General page and provide a descriptive name, like "Cows with SCC Over 1000". Click on the Save button along the bottom of the List View window, and then press Refresh. You will get a list of all cows with SCC over 1000 at their last test.
You can add as many fields as you want to. Remember that the more fields you add, the longer it may take to generate the list.
See List View and List Design Dialog for more information about lists.
DairyLive comes with several pre-defined event types (see Event Types). Some of these event types cannot be deleted or changed because DairyLive uses them to determine certain animal properties. However, you can add additional event types and modify existing event types.
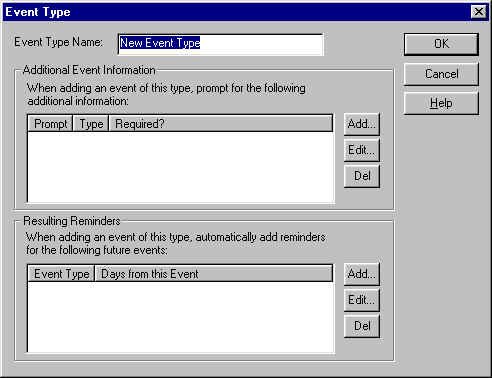
As an example, in the Herd Explorer click on the Event Types category on the left side and then select Object->New Event Type from the main menu. The following dialog will appear:
Type in an event type name, say, Tetnus Vaccination. Now press the Add button next to the Additional Event Information list. You will see this dialog:

Type in a prompt, say, Injection Site. Select what kind of data this will be. For this example, select Choice From and then type in some possible choices, one on each line, such as "Left Neck", "Right Neck", and "Rump". Now press OK. The new item will be added to the list. You can add as many items as you want. Press OK in the first dialog, and you have now added your own custom event type.
To test this, select several animals in the Herd Explorer and select Object->Animal->Quick Add Event. Select Body Condition Score from the Event Type drop-down list. The dialog should now look like this:
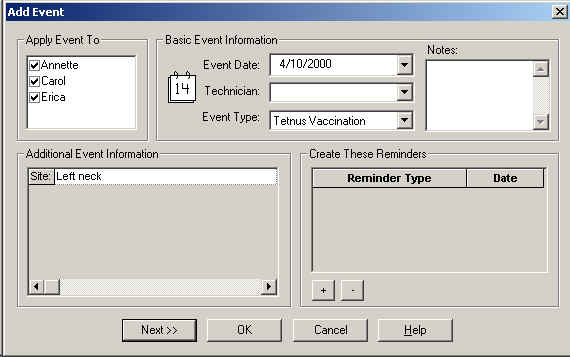
Notice that you are prompted for an Injection Site under Additional Event Information. Select one of the sites. You can also select an operator. Then press OK. The event will be added to all of the animals that you selected.
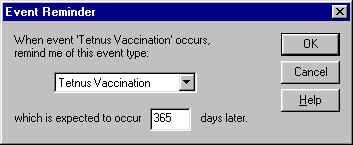
Now go back to the event type that you created in the Herd Explorer and double click on it. You can set up this event type so that reminders are created automatically when this event occurs. Click the Add button next to the bottom list and select Tetnus Vaccination in the drop-down list and type in 365 in the input box. The dialog should now look like this:
Press OK, then OK in the Event Type dialog. Now enter an event for some animals and select Tetnus Vaccination as the event type. You will see that reminders for another Tetnus Vaccination will be generated for one year from today.
Suppose you want to see which cows are due to be dried off this week. Go to the Herd Explorer and select all of the animals on the right side. You can do this by selecting the Animals category on the left side and then selecting Edit->Select All from the main menu. Now press the Reminders button on the toolbar. Sort the reminder list by date and select the animals you want to dry off. To make it easier to find these, you can change the event filter to only show the Dry Off reminders.
Select Event->Convert Reminder to Event from the main toolbar or click on the right-most button along the bottom of the Reminder view. You'll be presented with a dialog something like this:
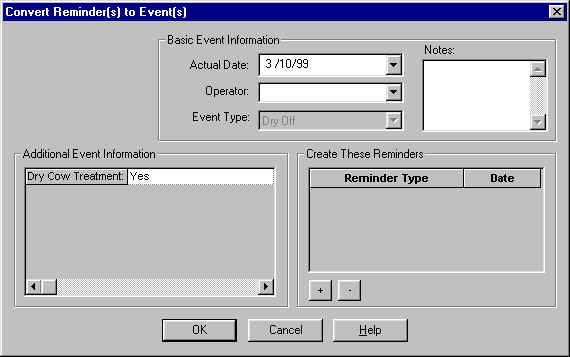
Select the actual event date, select an operator, and press OK. These reminders will now be converted to actual events and the cows will now be dry! Just to be sure, go back to the Herd Explorer and open the Dry Cows list. You should see the cows that you dried off.
You may have noticed in a List Design dialog on the General page, there is an "As Of" date which, by default, is today's date. You can change this date and then refresh the list. For example, you may want to see a list of cows that were your top producers one year ago. Set the As Of date to one year ago and refresh the list. The list will be generated as if it were one year ago, ignoring all data past then.
Reports can provide you with powerful analyses of your herd's performance. The Report Design dialog lets you specify how to organize your data (by week, month, quarter, or year), and the range of dates to use for the report. You can also specify which group of animals to include in the report. The group names correspond to the check lists that are in your database, for example, "Dry Cows", or "Heifers Ready to be Bred". You can also select as many animal properties as you want to display.
Once you have generated your report, you can export it to a comma-delimited file. This file can be imported into other applications, such as Microsoft Excel or Microsoft Access. You can also export it as an HTML file and publish it on your Web site!
Animals can be removed permanently or they can be marked as culled. It is suggested that you do not permanently delete an animal until you are sure you will no longer need the animal's data. For example, you may want to go look at a cow's lactation data from two years ago, even though you no longer have the cow.
To mark an animal as culled, open up that animal's Animal Details view and go to the In/Out page. Enter the date that the animal left the herd and select a reason (died, sold at auction, etc.) The animal is now culled. You can prevent this animal from showing up in your check lists and reports by adding a field "Culled equals No" in your list setups. This field is added for you automatically when you create a new check list. When you mark an animal as culled, it is automatically moved to the Culled Animals group in the Herd Explorer. This is a predefined group that cannot be deleted.
To permanently delete an animal and all its events and lactation data, select the animal to be deleted in the Herd Explorer and then select Object->Delete from the main menu. You'll be warned about deleting the animal. If you really want to delete it, press Yes and the animal will be gone forever.
In most of the DairyLive views, you can press the right mouse button and see a list of things you can do. This is very helpful when you are not sure what you can do at a certain point.
Most all of the dialogs and
windows in DairyLive have a Help button. Press this button to get
help pertinent to that dialog or window. There is also a Help
button ![]() on the
main toolbar. Clicking on this button will show a help topic on
the currently active view window.
on the
main toolbar. Clicking on this button will show a help topic on
the currently active view window.